|
|
|
|
|
|
|
|
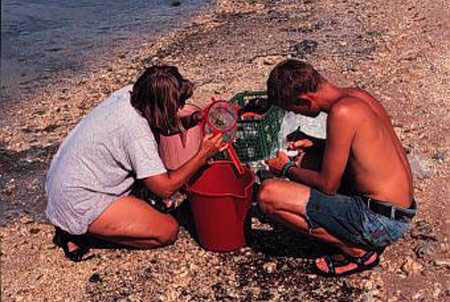
Archaeologists empty each container and collect its contents, mostly sand
and bits of sea creatures or shells. We use bucket flotation to separate
organic remains from heavier inorganic components.
|
|
|
|
|
|
|
|
Archaeologists empty each container and collect its contents, mostly sand
and bits of sea creatures or shells. We use bucket flotation to separate
organic remains from heavier inorganic components.
Bucket Flotation Procedures to Recover Archaeobotanical Remains
By Cheryl Ward, Ph.D.
What kinds of plant remains can be recovered from waterlogged archaeological sediments? Leaves, wood, charcoal, fibers, rope, textiles, seeds, dung, nuts, charred beans and grains in addition to small artifacts such as beads, weights, shot and jewelry?A general rule of thumb in working with waterlogged material is that black, brown or golden yellow small objects (1-20 mm long usually) are likely to be plant remains. These can be flat, round, squarish, oval or even easily recognizable nuts or fruit stones. All provide clues to the archaeobotanist and are equally important.
The most important thing for the flotation worker to remember as the process is conducted is that the seeds and other plant remains are extremely soft and fragile. Any pressure put on the seeds could cause them to break into unrecognizable fragments. The best way to prevent this is to keep your hands away from all the organic material-use water to move the flot (material recovered during flotation) as much as possible.
The outline below is intended as a rough guide to safe and efficient recovery of waterlogged plant remains from typical shipwreck deposits, e.g. from ceramic containers. Usually, ceramic objects will be full of a mixture of sand, pulverized bits of shell and sea life, wood from the ship, and a selection of plant remains from the container's original contents (perhaps) and the dispersed organic components of the cargo and ship. This process has been used more than 10,000 times by Institute of Nautical Archaeology staff and produces a wide range of archaeobotanical material in terms of species and size
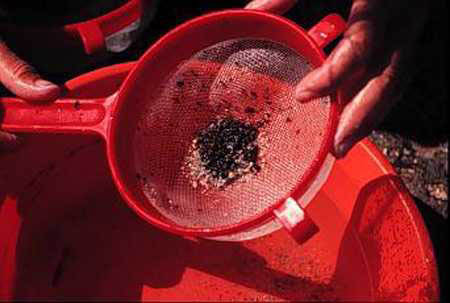
The dark bits of seeds and other plant remains are soft and waterlogged.
If the sample size is larger than two liters, or if it includes large foreign objects (shells, sherds, etc.) the whole recovery process will be hastened if you use a set of graduated sieves to cull these large bits. With a screen size of 7-10 mm, all the small plant material will pass through without being damaged as you pour the sample-containing-water from the object through the sieves into your bucket.
Check for brown and black lumps and bits on the screens-these are probably plant remains and should be put into a labeled container for plant remains unless they are clearly shell/stone/artifactual material and require other disposition. Use jeweler's tweezers for this-not your fingers-as the remains will be soft and squishy. It doesn't matter if you can identify these as plant remains or not, incidentally. That will be done later by a specialist who will always be glad to have too much rather than too little to work with.
2) Doing the flotation. This process relies on density. Waterlogged plant remains usually don't float; the floation process causes them to be briefly suspended in water so that they can be separated from the heavier bits of shell/sand/etc.
Equipment you will need: two buckets, a pair of nested 1mm sieves, sieves with larger screen sizes, a basin, labels, jars, paintbrush, jeweler's tweezers, water and a place to dump used water and sediment.
a) Prepare your receiving bucket by placing the sieves over it. Put water and a waterproof label that will fit into your sample jar into the basin.
b) Fill a "pouring" bucket 3/4ths full of clean water. Add about a liter of your sample to it, using your hand slowly and gently to make the transfer.
c) Using your hand, begin to swirl the water and sediment in the bucket. Don't scrape the bottom or the sides to prevent damage to the seeds, but try to get all the sediment moving. Create a vortex (like when you let water out of a sink or tub).
d) Once the vortex is moving quickly, rapidly pull your hand out, lift the bucket, and pour off the water through the sieves. Try not to get the sediment from the bottom of the bucket into the sieves, but do try to encourage dark bits to get there.
e) Take each sieve individually and submerge its base in the water-filled basin. Try to get the flot into as small an area as possible by gently lifting/rotating/submersing the sieve, then turn the sieve over and tap its edges against the basin so the flot falls into the basin. Use water, not your fingers, to push any remaining flot off the sieve. You may have to do it a few times. A squeeze bottle can provide gentle assistance as well.
f) Pour the water from the receiving bucket back into your pouring bucket. Replace the sieves over the empty bucket. Process the same portion of the sample again, and as many times as needed until the sieves no longer catch dark, organic matter.
g) Dump the floated sample onto a series of large sieves and wash thoroughly, check for large plant remains and artifacts, then discard sample.
h) Repeat until the entire sample has been processed.
i) Take the flot-holding basin and slowly pour off the water through nested sieves, leaving the flot and a little water in the basin. Empty the remaining flot, its label and water into a jar. Use water to move the flot, or a small paintbrush, lightly manipulated. You've worked hard to get your sample-don't squash it now. You can let the sample settle, pour off excess water, add more flot, etc. You'll probably do best if you conduct this whole step over a large, clean, dry basin. That way, if anything spills, its is a relatively simple matter to clean it up and you haven't lost any plant remains between the slats of the dock or onto the beach.
j) Storage. If the sample includes resin of any sort, don't add alcohol to the water. We have not had problems with mold or rot, but a 5% solution of alcohol and fresh water will keep any bacteria at bay. Samples should be stored in cool, dry conditions with labels inside and outside their containers. Make sure the lid fits tightly and/or put a piece of plastic wrap between the jar and its lid to reduce evaporation.